Adding Kitchen Cabinet Molding / Adding Moldings to your Kitchen Cabinets - Remodelando la Casa / Run a bead of wood glue down the back of one of the pieces of molding.
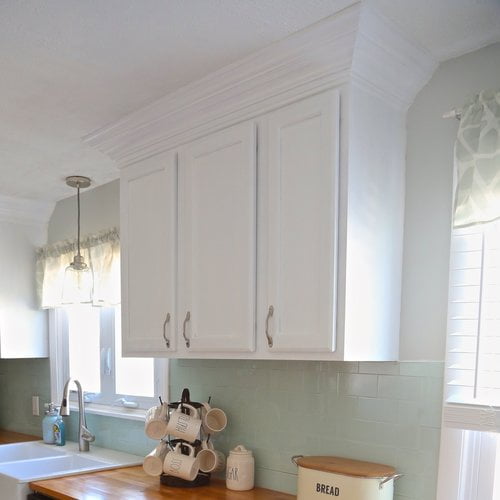
Adding Kitchen Cabinet Molding / Adding Moldings to your Kitchen Cabinets - Remodelando la Casa / Run a bead of wood glue down the back of one of the pieces of molding.. Angle crown molding in sterling gray. The points of the mitered end should be flush with the corners. You can attach using short nails, but for doors that are thin, you want to use a strong adhesive. (use one long strip for a row of cabinets the same depth.) then apply wood glue to each strip, nail it in place, and let dry. These will be the filler pieces.
Check out our video review and demo of adding crown molding to your kitchen cabinets. Add molding or trim to the doors. Cut strips of the 5/4 pine to length and width, based on the size of the cabinets. Decorative pieces you attach to the edges or the base of lower cabinets or the kitchen island. Moldings can be added to almost every part of a cabinet or shelf.
Adding crown molding to your kitchen cabinets. - Weekend Craft from weekendcraft.com A very simple and quick update is to add molding or trim to the cabinet doors. Check out our video review and demo of adding crown molding to your kitchen cabinets. I even used a temporary piece in the middle of that huge piece of moulding. Provide a nailing surface for crown moulding by attaching solid wood mounting strips to the top edges of the cabinets. These will be the filler pieces. I caulked along the crown moulding and seams. In this video we will go over some tips and tricks that might help whe. Moldings can be added to almost every part of a cabinet or shelf.
Steps for hanging crown molding:
We found it easier to do this with two people and started by fitting the moulding in, then fastening it first in the middle, the two ends and then along the bottom. 12 in stock at nearby store. The molding will immediately add a more luxurious appearance to your kitchen soffits. This is when stacked cabinets look the best. Attach crown molding dry fit the crown molding by holding the front piece and a side piece against the front and side of the baseboard (image 1). Steps for hanging crown molding: A very simple and quick update is to add molding or trim to the cabinet doors. Adding decorative molding to basic cabinets is an easy & affordable way to make a big impact in your kitchen. Crown molding will dress up the area. The points of the mitered end should be flush with the corners. Add molding or trim to the doors. Run a bead of wood glue down the back of one of the pieces of molding. These will be the filler pieces.
Add molding or trim to the doors. Liquid nail is a great product because it's strong and will last. Make sure the pieces are together and in place snugly. Decorative pieces you attach to the edges or the base of lower cabinets or the kitchen island. Hide the whole soffit by putting it just over the cabinets to give your kitchen a much better fashionable and glamorous look.
Adding Moldings to your Kitchen Cabinets | Kitchen soffit, New kitchen cabinets, Kitchen cabinet ... from i.pinimg.com I even used a temporary piece in the middle of that huge piece of moulding. You can attach using short nails, but for doors that are thin, you want to use a strong adhesive. And, yes, my kitchen was a disaster area for a few weeks during this process. Cut strips of straight 3 4 in x 1 1 2 in wood to fit the front and sides of each cabinet. Once the cuts are all made, spray paint the filler pieces to. 12 in stock at nearby store. Attach crown molding dry fit the crown molding by holding the front piece and a side piece against the front and side of the baseboard (image 1). Remove all cabinet doors, clean, and lightly sand.
A very simple and quick update is to add molding or trim to the cabinet doors.
Play up ordinary cabinets by inserting architectural details, such as corbels, at cabinet corners or other visible locations. Then nailed that into the cabinet and the 1 4 ledge we added for support. I caulked along the crown moulding and seams. These will be the filler pieces. Make sure that everything is lined up, joints are tight and the face frame is in line with the front of the cabinet. Lay the front nailing strip on the top of the cabinet and set it back by the thickness of the crown molding's lower edge. You can attach using short nails, but for doors that are thin, you want to use a strong adhesive. With crown molding it seems like there are 10 considerations to make for every single cut. Make sure the pieces are together and in place snugly. Ace hardware expert, mike jakubowski, walks us. This homeowner or designer added molding to the outside edge of the shelving, known as an edge molding. Remember, if you are adding crown molding, you need to leave room for that, or use wider width rails when building the face frames. Decorative molding on open shelving not only adds a new design feature, but it can also add a structural element.
Provide a nailing surface for crown moulding by attaching solid wood mounting strips to the top edges of the cabinets. This is when stacked cabinets look the best. Attach crown molding dry fit the crown molding by holding the front piece and a side piece against the front and side of the baseboard (image 1). Make sure to measure your depth and use the appropriate size screw. Use a pin nailer to nail into the corners of the two pieces of crown molding (image 2).
The Yellow Cape Cod: Making Cabinets Taller {Builder Cabinets Go Custom With Molding} from 4.bp.blogspot.com Decorative pieces you attach to the edges or the base of lower cabinets or the kitchen island. 12 in stock at nearby store. Play up ordinary cabinets by inserting architectural details, such as corbels, at cabinet corners or other visible locations. A very simple and quick update is to add molding or trim to the cabinet doors. This is when stacked cabinets look the best. Place it flush along the side of the cabinet. Make sure to measure your depth and use the appropriate size screw. Remember, if you are adding crown molding, you need to leave room for that, or use wider width rails when building the face frames.
Cut strips of straight 3 4 in x 1 1 2 in wood to fit the front and sides of each cabinet.
Provide a nailing surface for crown moulding by attaching solid wood mounting strips to the top edges of the cabinets. Secure into place with finishing nails. I caulked along the crown moulding and seams. Check out our video review and demo of adding crown molding to your kitchen cabinets. Lay the front nailing strip on the top of the cabinet and set it back by the thickness of the crown molding's lower edge. Then nailed that into the cabinet and the 1 4 ledge we added for support. Run a bead of wood glue down the back of one of the pieces of molding. Use a pin nailer to nail into the corners of the two pieces of crown molding (image 2). Attach crown molding dry fit the crown molding by holding the front piece and a side piece against the front and side of the baseboard (image 1). Make rabbet cuts on the filler pieces so that the piece fits tightly on the top of the cabinet and over the door of the cabinet. Moldings can be added to almost every part of a cabinet or shelf. Here's what our upper cabinets looked like the day we moved in. A very simple and quick update is to add molding or trim to the cabinet doors.